Check out the YouTube video for a showcase of the functionality built in this tutorial.
While verifiable credentials (VCs) open up the way for holders to prove certain aspects of their identity, there's a lot more you can do with the underlying technology used to transmit these verifiable credentials. Verifiable credentials should be transmitted over a secure channel, and in Paradym we use DIDComm as a way to exchange messages between multiple parties. DIDComm is a secure, peer-to-peer messaging protocol that allows you to exchange encrypted messages. It's a great way to exchange verifiable credentials, but it can also be used for other purposes. In this tutorial, we'll show you how to build a chatbot over DIDComm using DIDComm basic messaging and ChatGPT.
Having a trusted, end-to-end encrypted communication channel with your users, where the identity of the user is verified, is essential to prevent fraud. In the Netherlands, financial institutions and governments often still communicate using physical letters or a a custom message delivery system integrated into their own application. The reason for this is that the communication channels we use every day like email, WhatsApp, or SMS can not be trusted by these parties. There's no guarantee that the person on the other end is the person they say they are, and it's often hard to verify this. Verifiable credentials solve the identity part and allow you to verify the identity of the person you're communicating with. DIDComm solves the secure communication part, as it allows you to know it's always the same party on the other side, while verifiable credentials allow you to verify the identity of the person you're communicating with.
Let's outline a scenario where DIDComm could be used to securely communicate between a bank and a customer:
Alice is a citizen of the Netherlands and a customer of DutchBank. In her mobile wallet, Alice has a verifiable credential issued by the Dutch government, which acts as a digital identity card. Alice can set up a secure DIDComm connection with DutchBank and use that connection to send over a proof of her identity card. In addition, DutchBank also shares proof of a credential issued by the Chamber of Commerce that they are a registered financial institution in the Netherlands. Now DutchBank knows they're really interacting with Alice, and Alice can be certain she's not being phished. They can now securely communicate over this encrypted channel and potentially share sensitive information. In the future, they can re-use this channel and use it as a long-lived connection between Alice and DutchBank. Periodically, DutchBank can ask Alice to share a new proof of her identity card to make sure it's still valid.
While the scenario outlined above is quite complex, and requires verifiable credentials to be adopted by governments, banks, and other institutions, we can already start using this secure and private way of communication in Paradym today.
Paradym is a workflow builder specialized in working with verifiable credentials (VCs). The straightforward YAML syntax enables you to start building immediately, with no time spent decoding overly complex infrastructure issues.
In this tutorial, we'll show you how to build a chatbot over DIDComm using basic messaging and ChatGPT. We'll use Paradym to send and respond to messages from the user, OpenAI Chat API to automatically generate responses, and the BC Wallet as the chat interface. Currently, the Paradym Wallet does not support basic messaging, and thus we'll use the BC Wallet as a way to communicate with the chatbot.
The BC Wallet is a mobile wallet from the Government of British Columbia in Canada that supports the same secure and private DIDComm protocols as Paradym. This feature allows the Government of British Columbia to have a secure communication channel with their citizens have them securely share their identity with the government. Because this is built on open standards, it's possible for citizens to use this same wallet to communicate with other institutions, like banks, insurance companies, and other governments. The BC Wallet can be downloaded for free from the App Store or Play Store.
Before starting, it is recommended to watch a short video of the end result of this tutorial below.
Steps
- Create a connection and send welcome messages
- Get OpenAI API Key
- Reply to incoming messages using ChatGPT
Before you begin
This tutorial uses Paradym, a workflow builder for developers that provides the actions, workflows, and infrastructure you need to use verifiable credentials in your solution.
If you don't have an account yet, you can start with our quick start guide.
Also, make sure you have the BC Wallet installed on an Android or iOS device.
0. Intro
The workflows you build in Paradym are used for any process where information or proof of information is exchanged. A typical workflow contains four components:
- Name, a way to recognize your workflow in the platform
- Trigger, a way to execute your custom-made workflows
- Input Object, a JSONSchema that validates the input of your workflow
- Actions Array, the steps that your workflow takes to reach its overall goal
The actions are the building blocks with which you can customize your workflow. They enable you to make connections, issue credentials, send messages, request presentations, etc., in any order your application requires. Your workflow can hold for the input of a third party or execute all at once, depending on the specific actions you’ve chosen. Often, one workflow is to implement one user flow, meaning that at the beginning, a new user process is started, and at the end, a result is achieved.
Our chatbot over DIDComm requires two workflows.
- Create Connection and Chat: workflow used to create a connection with the BC Wallet and send two introduction messages.
- Reply using ChatGPT: workflow used to reply to incoming messages, generate a response using ChatGPT, and send that back to the user.
1. Create a connection and send welcome messages
First, we'll set up a workflow using Paradym. The workflow, when executed, will create a connection (with the BC Wallet in this case) and send two welcome messages to the agent we connect to.
Steps
-
Create a new workflow and name it Create connection and chat
-
The workflow will be triggered from the dashboard for now, for which we can use the API trigger
-
The workflow requires no input
-
The actions array requires three actions:
- Create a connection
- Two times, the send basic message action.
This is the full workflow. Feel free to edit the messages that will be sent after the connection is created, as well as the Ask me anything label. This label will be shown in the BC Wallet.
name: Create connection and chat

trigger:
  type: api

actions:
  - id: createConnection
    name: didcomm/createConnection@v1
    attributes:
      label: Ask me anything

  - id: sendBasicMessage
    name: didcomm/sendBasicMessage@v1
    attributes:
      connectionId: $.actions.createConnection.output.connection.connectionId
      message: Hey there! 👋

  - id: sendBasicMessage2
    name: didcomm/sendBasicMessage@v1
    attributes:
      connectionId: $.actions.createConnection.output.connection.connectionId
      message: >
        It's good to be connected. As my name suggests, you can ask me anything.
        I'll do my best to reply quickly.
We can now run this workflow and scan the QR code in the execution modal with the BC Wallet.
- Save and publish the workflow.
- Navigate to the
Executiontab. - Press
Manual ExecuteandExecute workflow. - Open the execution modal by clicking on the created execution.
- Click on the QR code icon next to
createConnectionand scan the QR code with the BC Wallet.
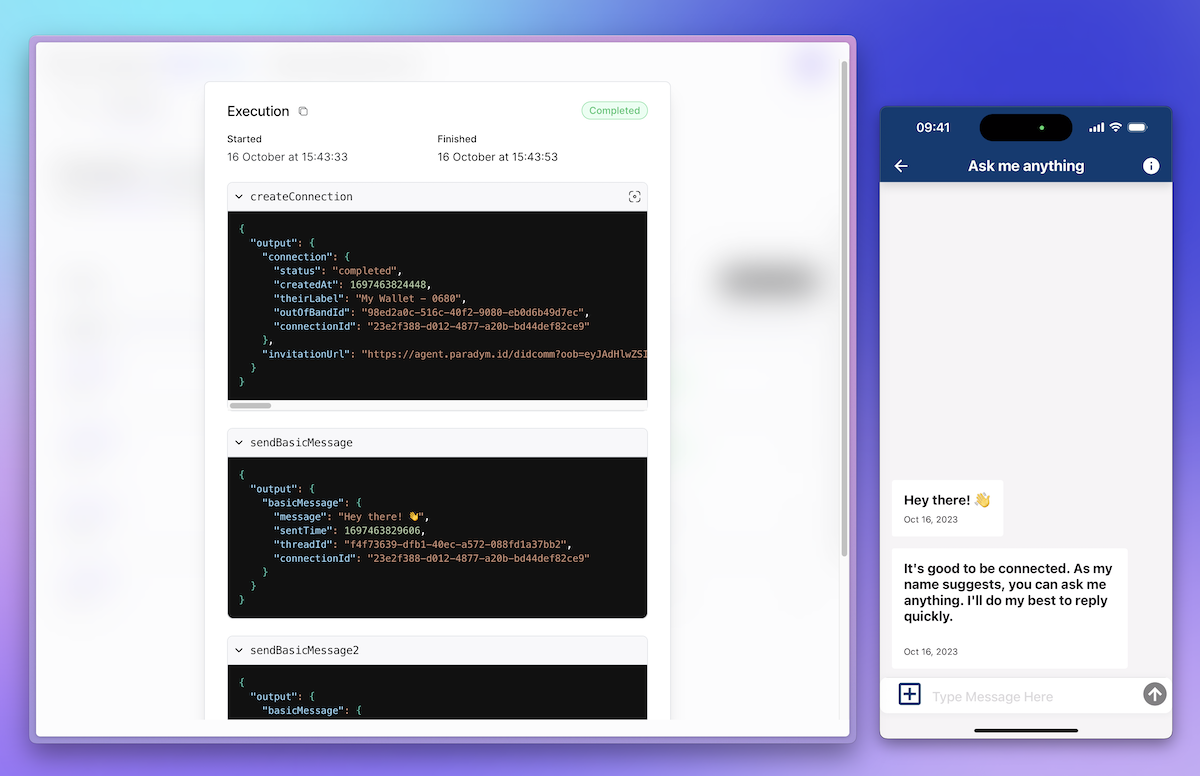
A completed workflow execution where Paradym created a connection with the BC Wallet and sent two introduction messages.
Great! We're now connected with the BC Wallet and have sent two messages to it. But we're not handling the incoming messages that we sent in response from the BC Wallet yet. Let's fix that.
2. Get OpenAI API Key
Before we can generate a response to incoming messages from the BC Wallet, we first need to get ourselves an OpenAI API Key. Follow the Help Guide from the OpenAI docs to generate an API Key. Make sure to copy it somewhere safe, as we'll need it in the next step.
3. Reply to incoming messages using ChatGPT
Finally, we'll create a workflow that responds to incoming messages sent from the BC Wallet.
The workflow will use a trigger type of didcommBasicMessageReceived, which will make the workflow run on every basic message we receive. Once we have received a message from the BC Wallet, we'll use OpenAI API key from the previous step to call the OpenAI Chat API and generate a response. Finally, we'll send the response back to the BC Wallet by sending another basic message.
Steps
-
Create a new workflow and name it Reply using ChatGPT
-
The workflow will be triggered using the
didcommBasicMessageReceivedtrigger -
The workflow will receive the basic message as input. This object contains both the message the user has sent as well as the
connectionId, which we'll need to send the response back to the user. -
The actions array requires two actions:
- A call to the OpenAI Chat API using the
general/fetchaction - The send basic message action to send the response to the user.
- A call to the OpenAI Chat API using the
Make sure to replace <YOUR OPENAI API KEY> with the API key you created in the previous step.
There's a few things to highlight here:
- The
general/fetchaction allows you to call any external API, and thus allows you to integrate Paradym with any external service. In this case, we're using it to call the OpenAI Chat API. - We can pass the message sent from the BC Wallet by referencing the input (
$.input.basicMessage.message). See theDidCommBasicMessagetype for exact details on the structure of the input. - The response from the OpenAI API call will be available on
$.actions.getResponse.output.choices[0].message.content. See the OpenAI Chat API documentation for more details on the response structure. - The basic message available on
$.input.basicMessagecontains theconnectionIdof the connection that sent the message to us. We can use this to send the response back to the user.
name: Reply using chatGPT

trigger:
  type: didcommBasicMessageReceived

input:
  type: object

actions:
  - id: getResponse
    name: general/fetch@v1
    attributes:
      method: POST
      url: https://api.openai.com/v1/chat/completions
      headers:
        'Content-Type': application/json
        Authorization: Bearer <YOUR OPENAI API KEY>
      payload:
        {
          'model': 'gpt-3.5-turbo',
          'messages':
            [
              {
                'role': 'system',
                'content': 'You are an "Ask me anything" chatbot. You are directly connected to an user, and are ready to answer questions. Try to be a bit funny, witty and use emojis . You can call yourself "Paradym''s Ask me anything chatbot".',
              },
              { 'role': 'user', 'content': $.input.basicMessage.message },
            ],
        }

  - id: sendResponse
    name: didcomm/sendBasicMessage@v1
    attributes:
      connectionId: $.input.basicMessage.connectionId
      message: $.actions.getResponse.output.choices[0].message.content
When we save and publish this workflow, it will automatically start responding to any incoming messages. Try it by responding to the messages we sent in the previous step from the BC Wallet; you should get a response back from the chatbot. Quite cool, right?
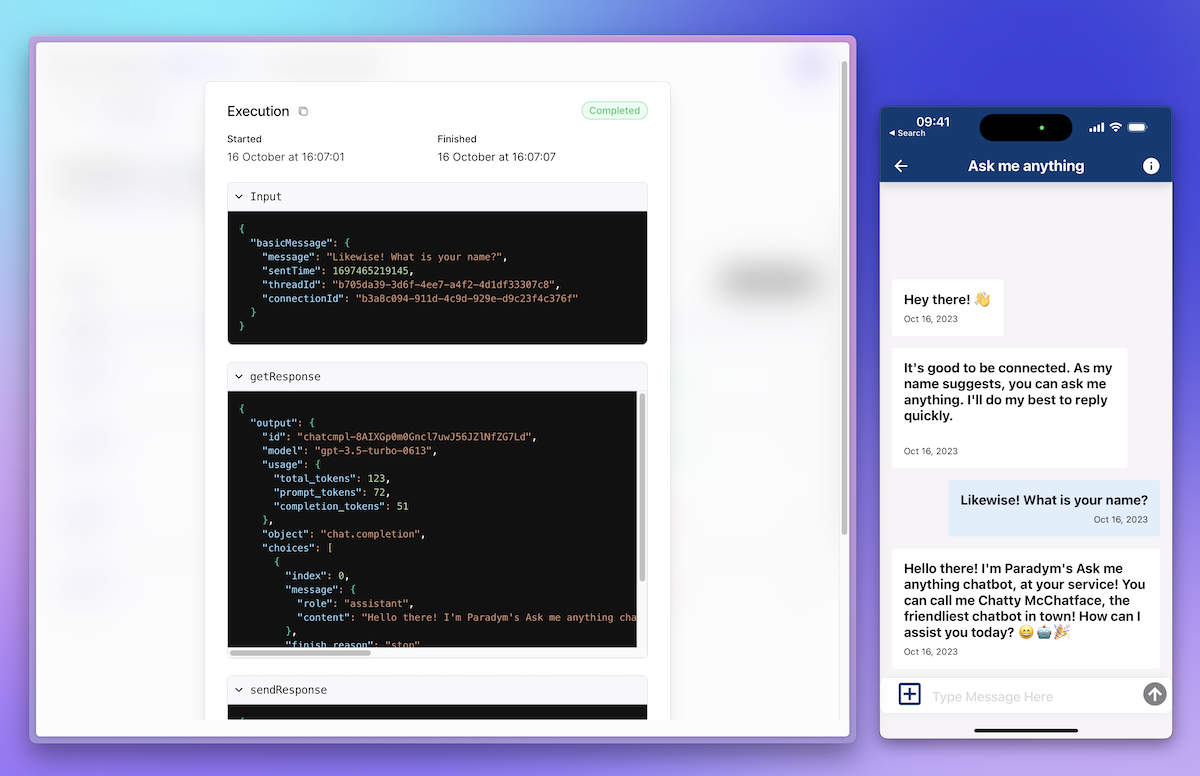
A completed workflow execution where Paradym responded to an incoming basic message and replied using the OpenAI Chat API.
Done! 🎉
With only two simple workflows, a small integration with the OpenAI Chat API, and by leveraging the BC Wallet from the Apple App Store/Google Play Store, we've created a fully automated chatbot over DIDComm.
The chatbot built in this tutorial is mostly a gimmick, but it shows how you can integrate secure messaging over DIDComm using a couple of lines of YAML code in Paradym. If you're ready to integrate messaging into your application, you can use the same approach to build a secure messaging channel between your application and your users.
If you're interested in integrating Paradym into your application through our API, the following tutorial dives a bit deeper into how you can use Paradym to build a university course management system that is integrated with the Paradym API.

Don’t forget to join the Paradym Community Slack and show us all of the awesome things you’re building.